
Understanding the Defect Liability Period (DLP) in Malaysia
However, not all properties are covered. The Housing Development (Control and Licensing) Act 1966, or HDA, only protects developments classified under a residential title. Properties under commercial or SOHO titles may not enjoy the same protection, so it’s important to know your entitlement.
Under the HDA, the DLP typically covers:
- 24 months for individual title properties (e.g. terrace or semi-detached homes)
- 36 months for strata title properties (e.g. condominiums, serviced apartments)
This DLP begins the moment you receive your keys or a vacant possession notice.
For homeowners, it’s your chance to inspect every corner of your property and catch hidden defects before they become costly, long-term issues. For developers and property agents, prompt rectification isn’t just about legal compliance; it helps reduce repair costs, improve buyer satisfaction, and protect your professional reputation.
In short, the DLP protects both parties but only if defects are properly inspected, documented, and submitted within this limited window. That’s why a comprehensive defect inspection isn’t just recommended. It’s essential.
The Comprehensive Defect Inspection Checklist: What to Look For
Essential Tools for Inspection
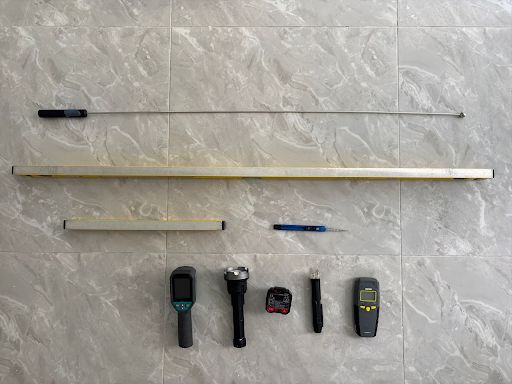
Before diving into the checklist, here’s a quick look at the tools commonly used to ensure thoroughness during a defect inspection:
- Tapping Rod – to detect hollow tiles or plaster walls
- Socket Tester – to check electrical outlets for faults
- Contactless Voltage Detector – to verify wiring safety
- Spirit Level – to check wall and floor alignment (variance >3mm is flagged)
- Torchlight – to inspect dark corners or concealed areas
- Thermal Imaging Scanner (FLIR) – to detect moisture or insulation issues
- Water Ponding Materials – for waterproofing tests in wet areas
- Digital camera & inspection app – for document defects with timestamps and photos
- Marking Tools – such as adhesive tape, colour stickers, or marker pens for tagging visible issues
- Basic Stationery – notebook, pen, paper, and measuring tape for on-site notes and measurements
- Ladder or Stool – to safely access elevated fixtures and ceiling corners
Step-by-Step Inspection Areas
External Areas

Start from the outside and work your way in. These are often overlooked, but external flaws can lead to drainage issues, water ingress, or premature wear if not corrected.
Gates, Mailbox, and Fencing:
- Ensure the gate opens and closes smoothly without grinding or loud noises.
- Check for loose hinges, damaged locks, or missing screws.
- Test the key to ensure the lock fits and turns easily.
- Look for rust, peeling paint, or corrosion on metal surfaces
- Confirm the fencing is aligned, secure, and crack-free.
- Inspect the mailbox for secure installation and any signs of rust or damage.
Driveway and Parking Area:
- Check for cracks, potholes, or uneven surfaces
- Look for signs of water pooling or poor drainage
- Inspect for paint stains, cement residue, or construction debris
Drainage Systems:
- Check all outdoor drains and outlets for blockages or debris buildup
- Ensure water flows smoothly with no signs of backflow or stagnant water
- Confirm the ground is properly sloped toward the drainage point
Outer Walls:
- Look for visible cracks, stains, or patchy paintwork
- Check for efflorescence (white, powdery salt deposits caused by moisture)
- Tap gently to detect hollow spots in plastered areas
- Inspect sealant around windows and wall joints for gaps or peeling
Balcony & Porch:
- Check for loose or wobbly railings, rust, or missing screws
- Inspect tiles for unevenness, cracks, or poor alignment
- Ensure drainage holes are unblocked to prevent water pooling
- Test the floor for stability and surface evenness
Roof Elements, Gutters, and Downpipes:
- Inspect visible roof edges for cracks, gaps, or missing tiles
- Check gutters and downpipes for clogging, rust, or signs of leakage
- Ensure all components are properly aligned and securely fixed
- Look for water stains or streaks on walls that may indicate overflow
Landscape & Garden Areas:
- Ensure the soil slopes away from the house, not toward it
- Check for water pooling, soggy patches, or poor surface runoff
- Inspect for erosion, exposed roots, or uneven ground levels
- Make sure retaining walls, if any, are stable and crack-free
Internal Areas
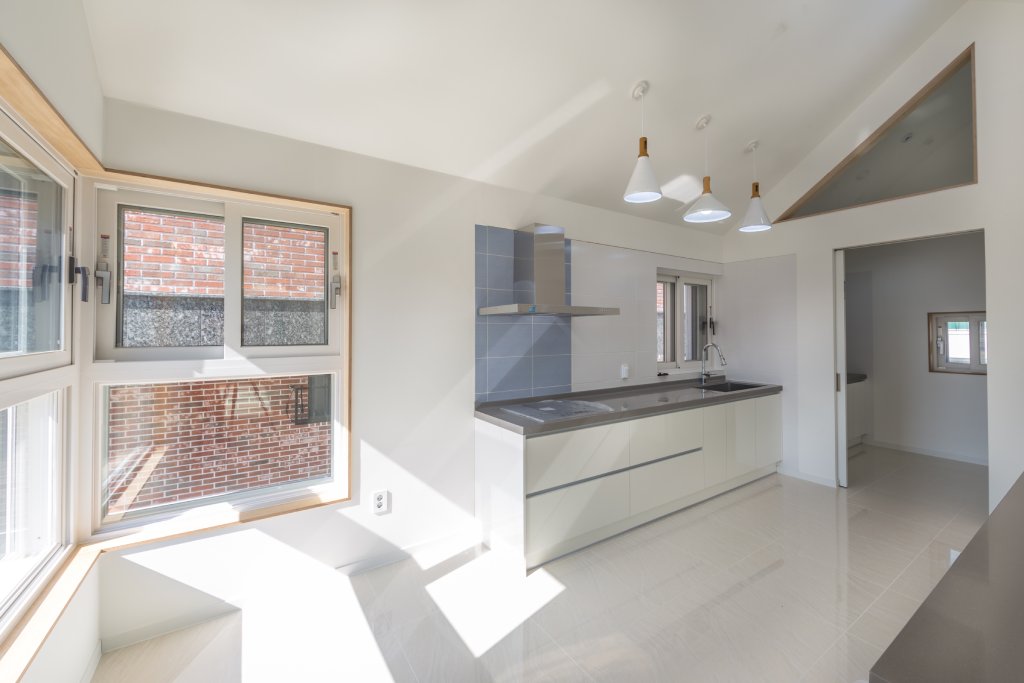
Once you’ve completed the external inspection, it’s time to move indoors. The internal spaces of your home, from walls and ceilings to tiles, windows, and built-in fixtures, must be carefully inspected for both aesthetic quality and functional integrity.
Walls and Ceilings
- Check for hairline cracks, watermarks, stains, or patchy paintwork
- Inspect wall corners and ceiling lines for straightness and even finishes
- Look for visible joints, bubbling, or peeling paint.
- Watch for protruding nails, rough patches, or signs of previous repair work.
Tiles and Floors
- Tap tiles with a tapping rod to detect hollow or loose spots
- Look for cracked, chipped, or slanted tiles, especially near corners and doorways
- Check for uneven grout lines, stains, or leftover cement residue
- Inspect the floor skirting for gaps or poor alignment
Doors and Windows
- Open and close all panels to ensure smooth operation without squeaking
- Inspect for misaligned frames, gaps, or difficulty locking
- Check glass panels for scratches, cracks, or poor sealing
- Test all locks, latches, and handles for proper installation and function
Cabinets and Countertops
- Ensure all cabinets are securely mounted, aligned, and free from warping
- Check for scratches, dents, or chipped corners
- Open and close drawers to test for smooth movement and proper alignment
- Inspect countertop joints for clean finishes and no gaps or water damage
Electrical Systems
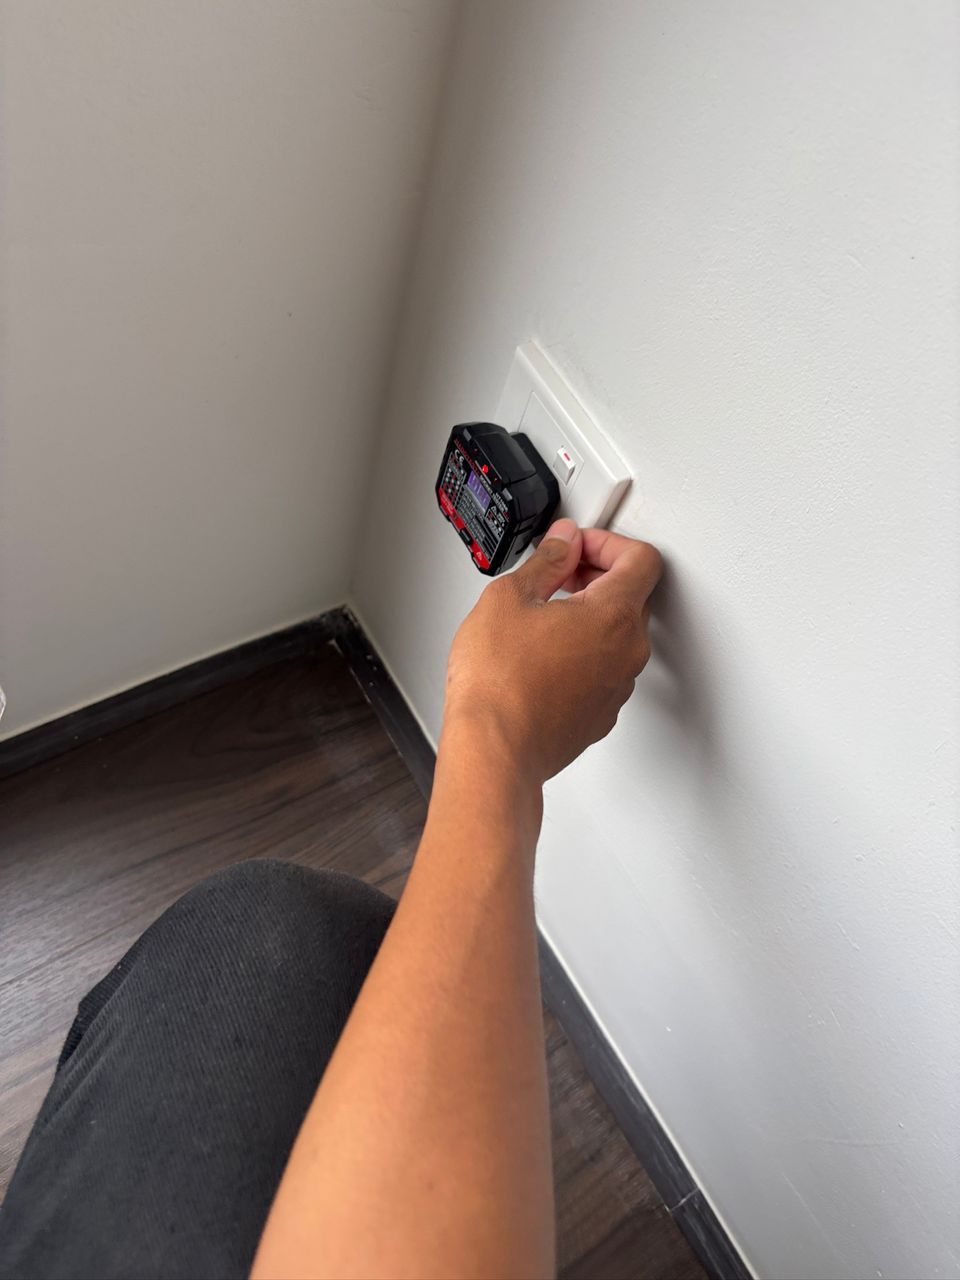
Power Outlets and Light Switches
- Test each switch and outlet to ensure they function correctly and are properly wired
- Use a socket tester to detect wiring faults or reversed polarity
- Check that outlets and switches are securely mounted with no gaps or loose faceplates
Ceiling Fans and Lights
- Turn on all lights and fans to confirm full functionality
- Ensure fans rotate smoothly without wobbling or noise
- Inspect light fittings for loose covers or poor alignment
Circuit Breakers (DB Box)
- Open the DB box and check for clear, correct labelling of circuits
- Test each breaker to ensure it responds and resets properly
- Look for signs of overheating, rust, or burnt smells around the panel
Air Conditioner Points, Water Heater Points, Doorbells
- Verify that all points are securely installed and properly wired
- Check that wall-mounted units have no exposed wires or loose fittings
- Test doorbells for sound clarity and responsiveness
Pro Tip: Identifying live wiring issues isn’t always possible with the naked eye — and mistakes can be dangerous. Electrical defects are one of the most critical parts of a home inspection because you’re dealing with live power that can cause fires or serious injury.
That’s why it’s best to leave this to professionals. At Studio Pandan, our experienced team is trained to detect hidden electrical hazards safely and accurately. We use contactless voltage detectors — a non-invasive tool that identifies faults without removing faceplates — to ensure every inspection is thorough, safe, and hassle-free.
Plumbing and Water Systems

Plumbing issues are some of the most common and costly problems if not identified early. Leaks, poor drainage, and faulty pipe installations can lead to water damage, mould growth, and long-term repair expenses.
Taps, Showers, Sinks, Bathtubs, and Toilets
- Turn on all fixtures to check for consistent water pressure and smooth flow
- Look for leaks around joints, loose handles, or drips after closing
- Test toilet flushes for functionality and refill time
- Observe how quickly water drains — slow drainage may indicate clogs or poor plumbing work
Water Heater
- Switch on the heater and confirm it heats water within a reasonable time
- Ensure the unit is securely installed, with no exposed wires or water leaks
- Check for proper electrical and plumbing connections
Overall Drainage System
- Pour water into floor traps, sinks, and basins to test flow speed
- Watch for gurgling sounds, foul odours, or standing water, which may signal blockages.
- Confirm that bathroom floors slope correctly toward the drains — poor gradients can cause ponding.
Waterproofing Test
Water ponding is one of the most common and costly defects in wet areas. To catch this early, Studio Pandan performs a 30–60 minute ponding test in every bathroom and wet zone. If water remains after draining, it’s a clear sign of poor floor slope or waterproofing failure, and something you’ll want fixed before renovations begin.
Fixtures and Fittings

Fixtures and fittings may seem minor compared to structural or plumbing issues, but they play a big role in day-to-day comfort and functionality. Loose towel rails, misaligned cabinets, or missing accessories are common defects that can be easily overlooked.
- Cross-check all provided items (e.g. taps, sinks, towel rails, shelves, mirrors) against the developer’s specification list
- Inspect for proper installation; fittings should be level, secure, and firmly attached.
- Look for scratches, dents, or cracks on surfaces like mirrors, glass panels, and stainless steel accessories.
- Ensure toilet paper holders, soap trays, and hooks are not loose or misaligned.
- Test all hinges, latches, and sliding components to confirm smooth movement and proper alignment.
- Check built-in cabinets and wardrobes for internal defects, uneven doors, or poor finishing.
- Ensure electrical fixtures (like lights or switches) have no exposed wires and faceplates flush with the wall.
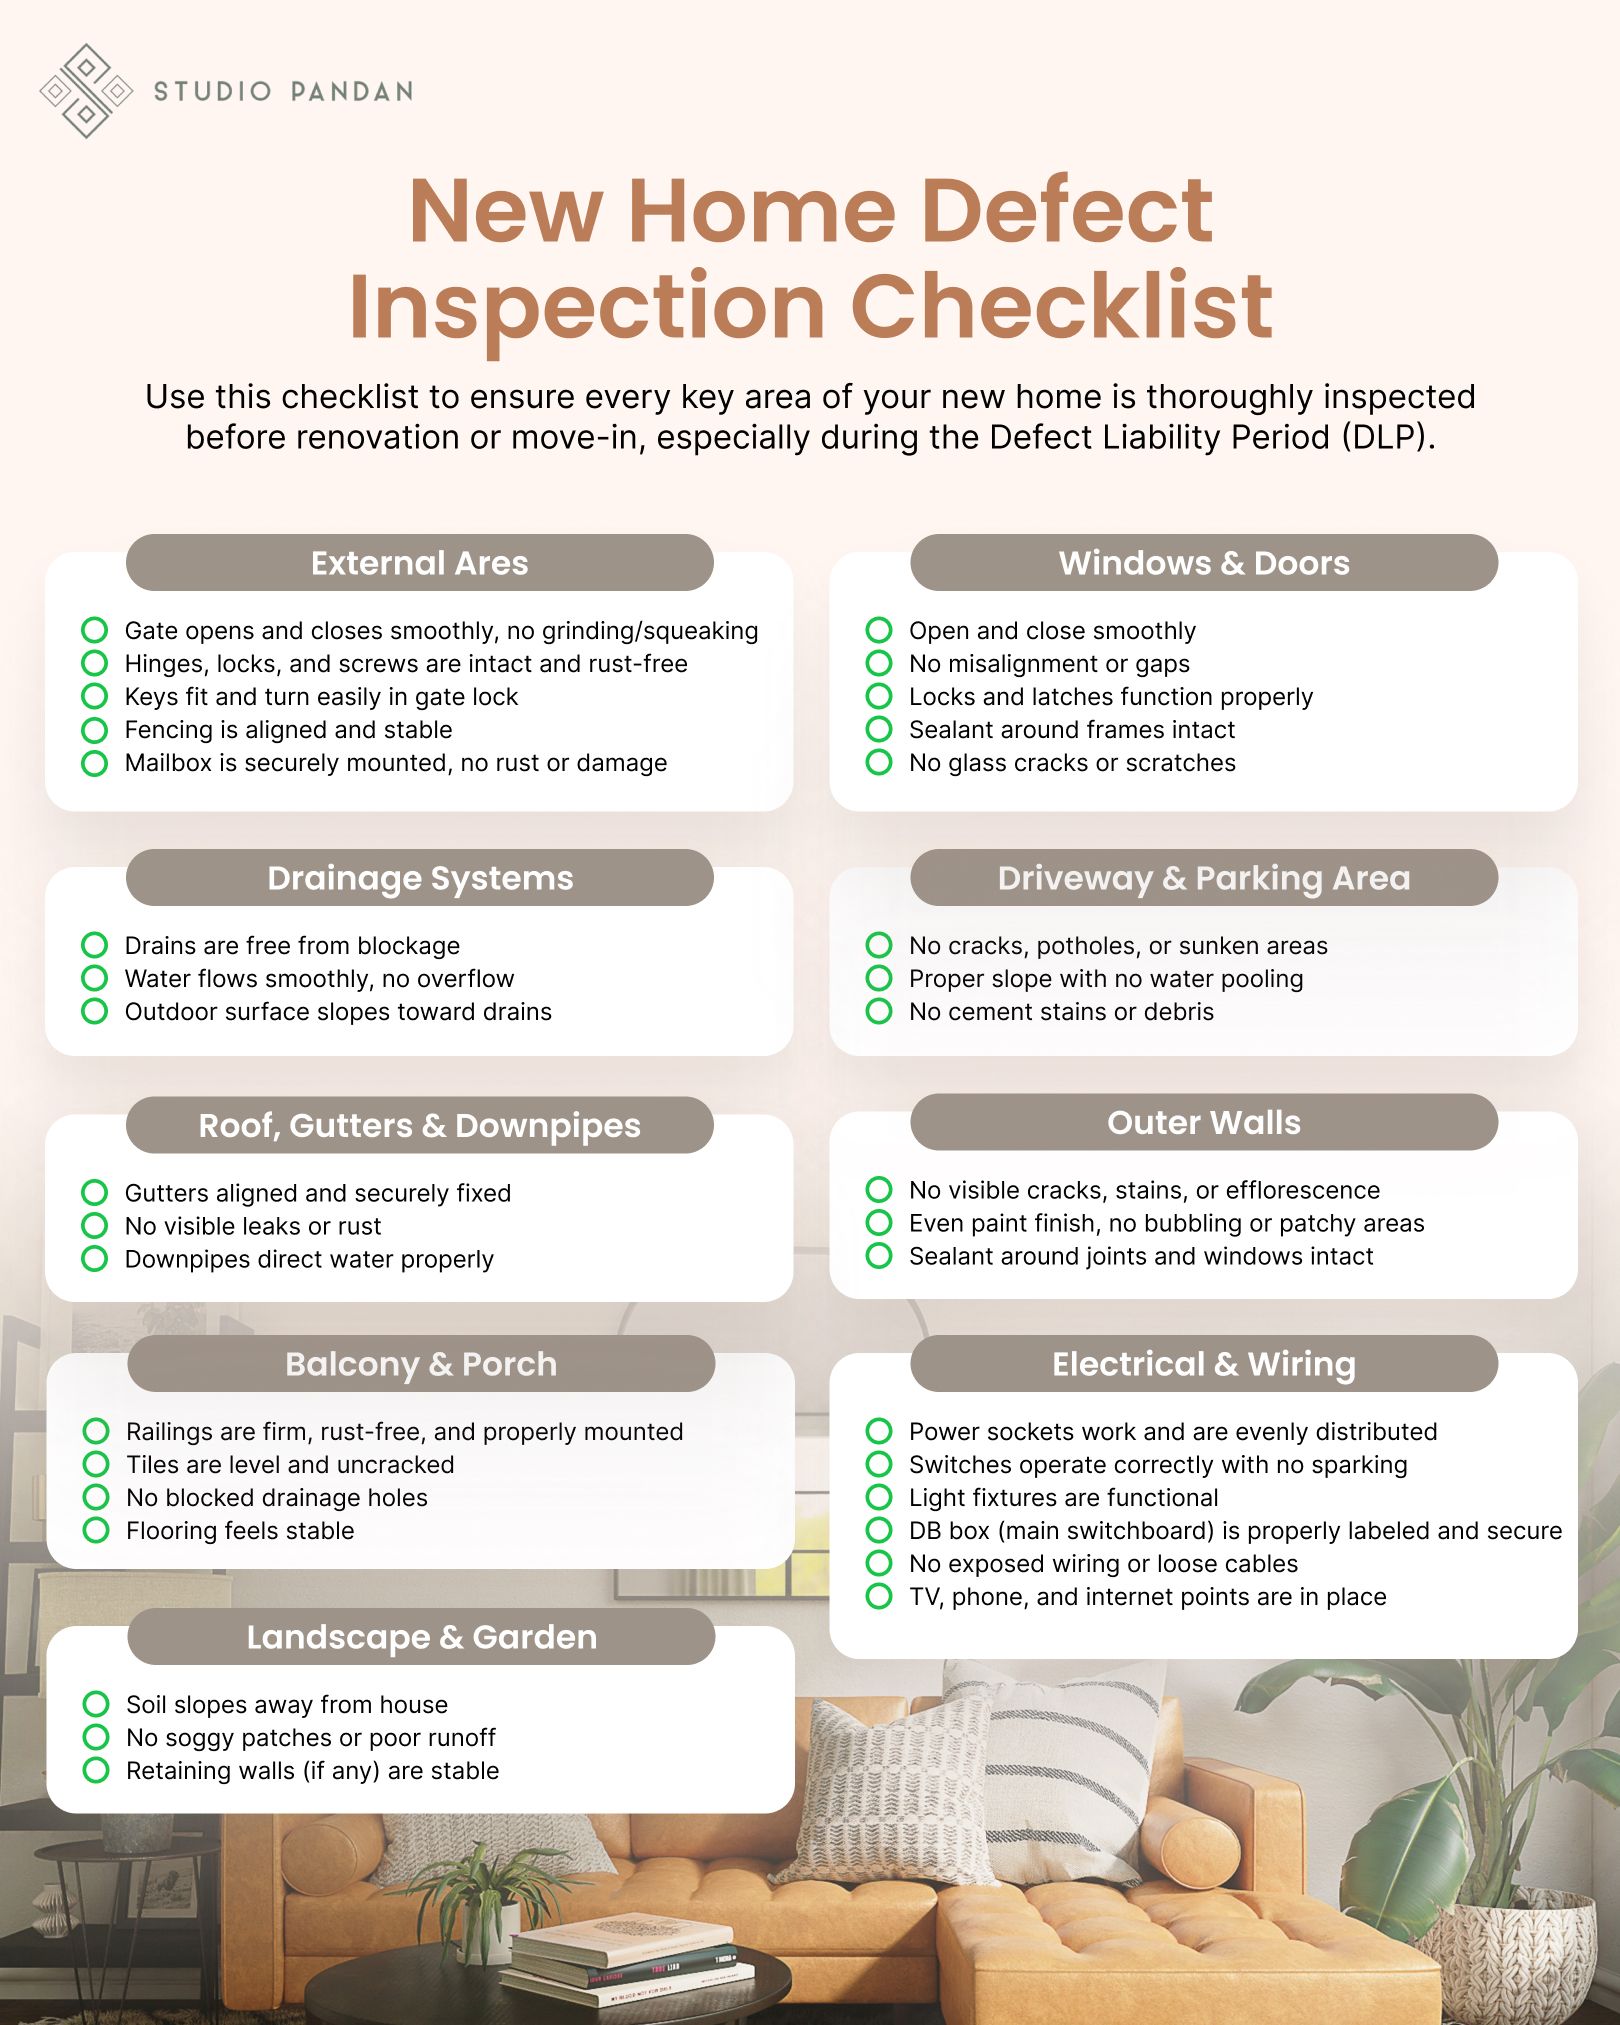
New Home Defect Inspection Checklist
Use this checklist to ensure every key area of your new home is thoroughly inspected before renovation or move-in, especially during the Defect Liability Period (DLP).
Reporting Home Defects: What to Do After the Inspection
Once you’ve completed your defect inspection and identified issues around the property, the next crucial step is to report them correctly to your developer. This isn’t just about handing over a list — it’s about creating a clear, well-documented record that ensures your defects are acknowledged, tracked, and rectified within the Defect Liability Period (DLP).
The better your documentation, the smoother the follow-up process will be. Here’s how to do it right

1. How to Document Defects
Take clear photos or videos of each issue, ideally with timestamps. Use marker pens, adhesive tape, or coloured stickers on-site to mark each defect clearly. This helps ensure nothing is overlooked during rectification.
Alongside visual proof, write down the type of defect, its location, and any relevant observations, such as a leak that only appears when a tap is turned on.
2. How to Report to the Developer
Submit your defect list through the developer’s official platform — this could be a mobile app, online portal, or form provided during handover.
Always include your unit number, contact details, and a clear breakdown of the defects, organised by room or area. If no digital platform is available, send a written notice with photo evidence via email or physical submission..
Also, check if the developer requires a specific format or if there’s a submission deadline, as missing these requirements may delay or void your claims.
3. Why Clear Communication Matters
Keep your message firm yet polite. A clear, respectful language helps avoid misunderstandings and ensures smoother coordination. Ask for written confirmation that your submission has been received, and request an estimated timeline for when the rectification work will begin and be completed.
If no timeline is given, follow up in writing and keep track of all replies.
4. Maintain a Record of Everything
Be sure to save copies of all defect lists, emails, messages, and any official responses from the developer or building management. Keep your photos, videos, and written notes in a folder.
These records will protect you in case the developer doesn’t follow through. If the defects are not fixed within the DLP, you can use this evidence when escalating the case to the Tribunal for Homebuyer Claims.
The Risks of Skipping a Professional Home Inspection
1. Missed Critical Defects
Home defects aren’t always visible on the surface. Many issues are hidden behind walls, floors, or ceilings, making them nearly impossible to spot.
A DIY inspection might overlook structural issues, plumbing faults, or hidden electrical risks, which could go unresolved until they cause bigger problems like water damage or even electrical fires. Professionals, however, use advanced tools and their experience to identify problems that the average homeowner would miss.
2. Unknowingly Accepting Poor Workmanship
Many common home defects are related to poor craftsmanship or substandard materials. Without the right expertise or tools, it’s easy to overlook these subtle issues that may not be immediately obvious.
This could mean unknowingly accepting defects like misaligned doors, shoddy electrical work, or improperly installed plumbing — issues that could affect both your home’s value and your safety in the long run. A professional inspection catches these small but significant problems early, before they escalate.
3. Losing Leverage During Handover
The Defect Liability Period (DLP) is your time to report defects to the developer for free repairs. If your DIY inspection misses critical issues or isn’t properly documented, you risk losing leverage during the handover process.
Developers may dispute defects or claim that issues weren’t reported on time, leaving you to pay for repairs that should have been covered. A professional inspection, on the other hand, gives you a stronger case, ensuring the developer takes responsibility for necessary repairs.